3.1 One Point Perspective Drawing
A. Learning Objectives
- Use perspective sketches to illustrate
design ideas (e.g. of product,
architecture, interior design, and
window display)
[from HKDSE DAT curriculum: Module 5 Visualisation and Computer-aided Design (CAD) Modelling]
- Use perspective sketches to illustrate
design ideas (e.g. of product,
architecture, interior design, and
window display)
Revision: Orthographic Projection (Parallel Projection)
B. Notes
(Source: https://www.studentartguide.com/articles/one-point-perspective-drawing)
Drawing in one point perspective is usually appropriate when the subject is viewed ‘front-on’ (such as when looking directly at the face of a cube or the wall of building) or when looking directly down something long, like a road or railway track.
Rules of perspective: true shapes, vanishing points and horizon lines
In one point perspective, surfaces that face the viewer appear as their true shape, without any distortion. They are drawn using primarily horizontal and vertical lines, as illustrated by the diagram below:

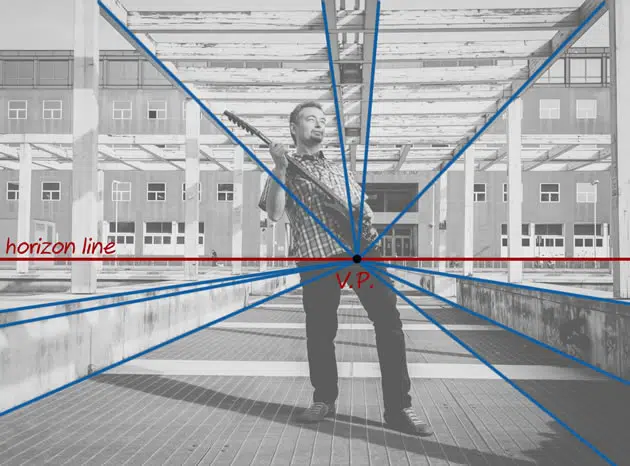
Surfaces that travel away from the viewer, on the other hand, converge towards a single ‘vanishing point‘. This is a point that is located directly in front of the viewer’s eyes, on a ‘horizon line’ (also known as an ‘eye level line’), as illustrated in the photo below:
Demo 1 (MUST SEE!)
Demo 2: One Point Perspective ROOM with floor, window and door (Geogebra)
What is wrong in Demo 2 drawing?Key Points:
- Surfaces that face the viewer are drawn using their true shape
- Surfaces that travel away from the viewer converge towards a single vanishing point
To understand how to draw a room in one point perspective, please view our step-by-step video:
C. Exercises
Ex.1 Cubes and Rectangular Blocks
By the completion of this exercise, you should be able to:
- Use appropriate line weights (light lines for construction lines; dark lines for outlines)
- Position a vanishing point and horizon line correctly
- Understand that:
- Objects above the horizon line are drawn as if you are looking up at them (you see the bottom of the object)
- Objects below the horizon line are drawn as if you are looking down at them (you see the top of the object)
- Objects that are neither above nor below the horizon line are drawn as if you are looking directly at them (you see neither the top or the bottom of the object)
This information is demonstrated in the video tutorial below:
Ex.2 Finding Centres and Equal Spaces
By the completion of this exercise, you should be able to:
- Find the centre of any rectangular surface using the ‘corner to corner’ method (this works even on surfaces that are receding towards the vanishing point)
- Divide the surface of any rectangular block into any number of equal parts
- Draw tiles on a floor in one point perspective
- Draw repeating elements, such as fence posts, receding into the distance
This is explained in the following video tutorial:
E. Enrichment (optional)
Sketchup (https://app.sketchup.com/app: in "Scenes")- 2-point perspective (Demo. in Geogebra)
- 3-point perspective
- Parallel projection
F. News (optional)
- DSE|設計與應用科技科卷二試題疑出錯 考生憂失分老師批無把關
... 試卷一點透視圖出錯 學者稱若應考:我會亂咁畫 ...
- DSE|設計與應用科技科卷二試題疑出錯 考生憂失分老師批無把關